Anyone who uses a computer regularly knows the importance of a smooth, accurate mouse. Over time, your optical mouse can start to behave strangely—jumping, lagging, or failing to click. Often, the culprit is simple: dirt, dust, and grime build up, especially around the sensor and buttons. Cleaning your optical mouse is one of the easiest ways to restore its performance, prevent long-term damage, and keep your workspace hygienic. Let’s explore how to clean your optical mouse properly, what tools you need, and the best practices for long-term care.
Understanding Optical Mouse Technology
Before cleaning, it’s helpful to know how an optical mouse works. Instead of a rolling ball, an optical mouse uses a light source (usually a red LED) and a small camera to detect movement on a surface. The sensor takes thousands of pictures per second, and the processor compares these images to detect movement direction and speed.
Because this sensor is exposed at the bottom, even tiny particles or smudges can interfere with its ability to read the surface. Unlike older mechanical mice, there’s no ball to remove, but optical mice still require regular cleaning—both outside and, sometimes, inside.
Why Regular Cleaning Matters
- Better accuracy: Dirt around the sensor confuses the tracking system, causing jittery or unresponsive movement.
- Longer life: Dust and grime can wear down switches and internal components.
- Hygiene: Your mouse collects bacteria from hands, food, and desk surfaces. Regular cleaning reduces germs.
- Consistent clicking: Debris around buttons can cause double-clicking issues or make clicks unresponsive.
Tools And Supplies Needed
Cleaning an optical mouse doesn’t require special equipment, but using the right tools makes the process safer and more effective. Here’s what you’ll need:
- Lint-free microfiber cloth: Won’t scratch plastic surfaces.
- Cotton swabs: For tight spaces around the buttons and sensor.
- Isopropyl alcohol (70% or higher): Dries quickly and disinfects.
- Compressed air can: Blows out dust from crevices.
- Toothpick or soft brush: Removes stubborn dirt from seams.
- Mild dish soap and water: For deeper cleaning of the exterior.
- Small screwdriver: If you need to open the mouse for internal cleaning (only for advanced users).
Never use harsh chemicals, bleach, or abrasive pads—they can damage the mouse’s surface and electronics.
Credit: www.wikihow.com
Step-by-step: Cleaning The Exterior
Most dust and grime collects on the outside of your mouse. Regular surface cleaning is quick and safe for everyone.
Unplug Or Power Off
Always disconnect a wired mouse or turn off a wireless mouse before cleaning. This prevents accidental clicks or short circuits.
Wipe Down The Surface
Dampen a microfiber cloth with a small amount of water or isopropyl alcohol (never soak it). Wipe the top, sides, and bottom of the mouse, focusing on areas where your fingers rest.
Pay attention to:
- The left and right buttons
- Scroll wheel area
- Sides and back
If there’s sticky residue, a drop of mild dish soap on a damp cloth can help. Avoid getting moisture inside the mouse.
Clean The Scroll Wheel
Use a cotton swab slightly dampened with alcohol to clean both sides of the scroll wheel. Rotate the wheel to reach all areas. Built-up grime here can make scrolling rough or noisy.
Tidy The Seams And Crevices
A toothpick or soft brush can remove dirt trapped in the cracks around buttons and the scroll wheel. Do this gently to avoid scratching the plastic.
Dry Thoroughly
After cleaning, let the mouse dry completely before plugging it back in or turning it on.
Deep Cleaning The Sensor Area
The optical sensor is the most sensitive part of your mouse. Even a hair or speck of dust here can cause major tracking problems.
Inspect The Sensor
Hold the mouse up to the light and look at the small opening where the red LED shines. If you see dust or smudges, it’s time to clean.
Use Compressed Air
Hold the can upright and give a short burst of air into the sensor opening. This blows out dust without touching the lens.
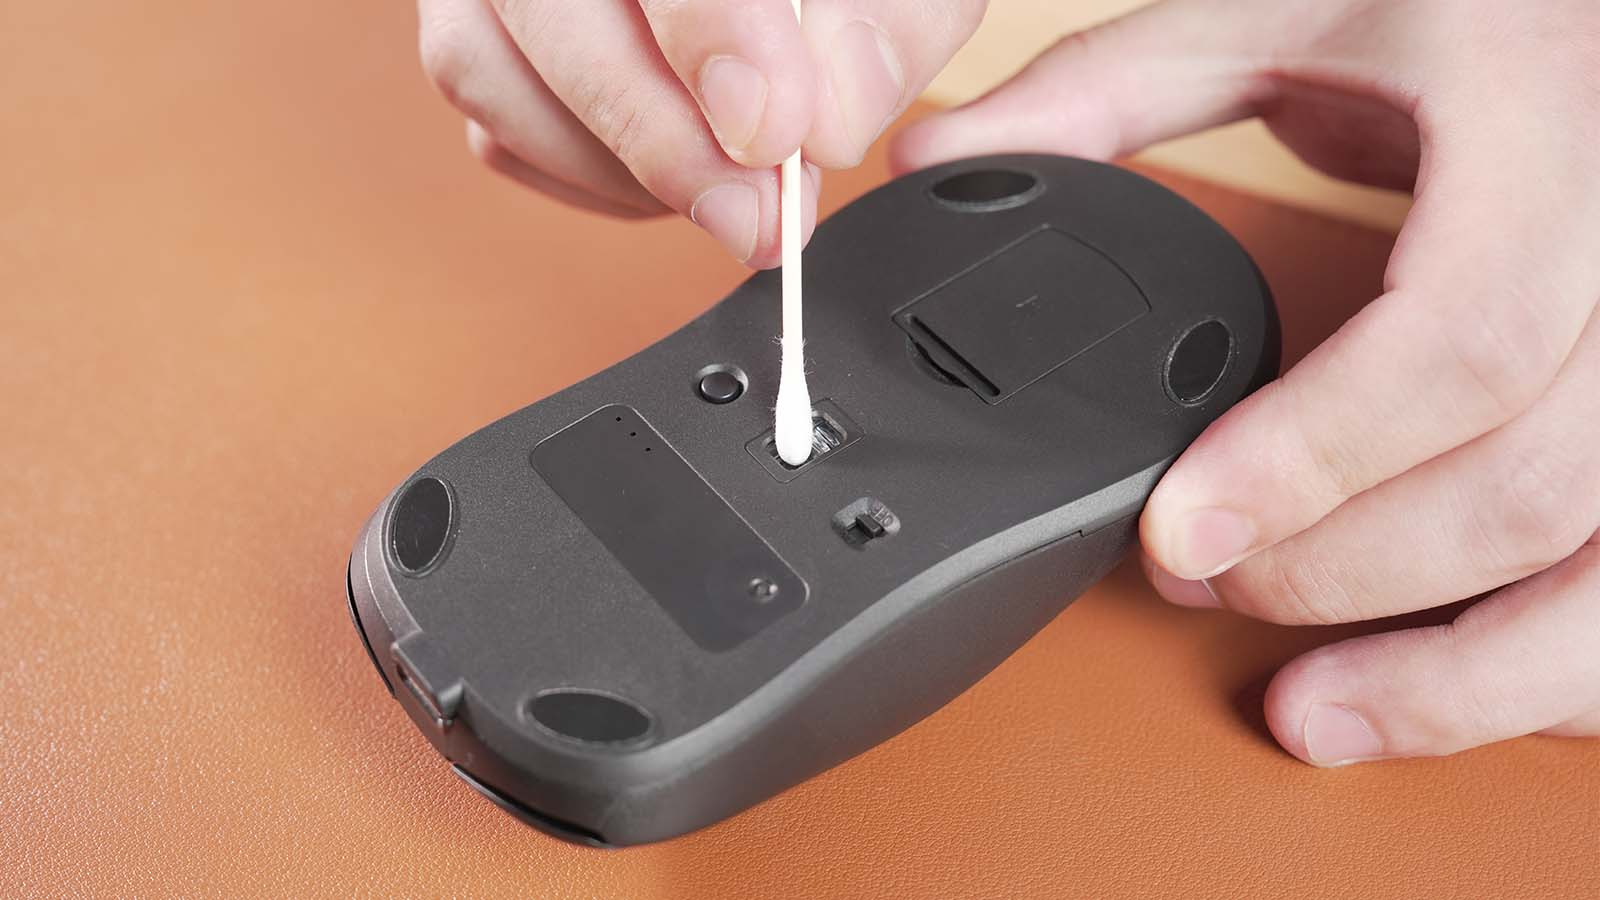
Clean With A Cotton Swab
If debris remains, gently wipe the sensor opening with a dry cotton swab. For stubborn grime, you can barely dampen the swab with isopropyl alcohol—never apply liquid directly to the sensor.
Quick Comparison: Cleaning Methods For The Sensor
| Method | Best For | Risk Level |
|---|---|---|
| Compressed Air | Loose dust | Very Low |
| Dry Cotton Swab | Stuck particles | Low |
| Alcohol Damped Swab | Sticky smudges | Medium (avoid excess liquid) |
Pro tip: Never use metal tools or sharp objects near the sensor—they can scratch the lens and permanently damage tracking.
Advanced Internal Cleaning
Most users never need to open their mouse. But if you notice sticky buttons, rattling, or liquid spills, a deeper clean can help. Only try this if your mouse is out of warranty or you’re confident with electronics.
Opening The Mouse
Look for screws on the bottom—often hidden under stickers or pads. Use a small Phillips screwdriver. Take photos as you go, so you can reassemble everything.
Cleaning Inside
- Use compressed air to blow out dust.
- Wipe plastic parts gently with a microfiber cloth.
- Avoid touching circuit boards with wet tools.
- If you spot sticky residue, lightly dampen a cotton swab with alcohol.
Let all parts dry fully before putting the mouse back together.
Warning: Opening your mouse may void the warranty. Some mice snap together without screws and are hard to open without breaking.
Cleaning Different Mouse Types
There are many types of optical mice. While the basic cleaning steps are similar, some details change based on design.
Wired Vs Wireless
- Wired: Unplug before cleaning. No batteries to remove.
- Wireless: Turn off power and remove batteries. Clean battery contacts with a dry cotton swab if there’s corrosion.
Gaming Mice
High-end gaming mice often have extra buttons and RGB lighting. Pay extra attention to:
- Button gaps: Use compressed air for extra switches.
- Removable weights or panels: Take them out and clean underneath.
- Sensor: Gaming sensors are more sensitive—keep them spotless.
Travel Or Ultra-compact Mice
Small mice have tighter spaces. Use toothpicks and compressed air for seams, and avoid using too much liquid.
Credit: www.youtube.com
Common Problems Solved By Cleaning
A dirty optical mouse can cause many issues that people often mistake for hardware failure.
- Cursor jumps or skips: Usually dirt on the sensor.
- Double-clicking when you single-click: Debris under the button.
- Scroll wheel scrolls erratically: Dust or grime in the wheel’s mechanism.
- Mouse not detected: Corrosion or dirt in the USB port or battery contacts.
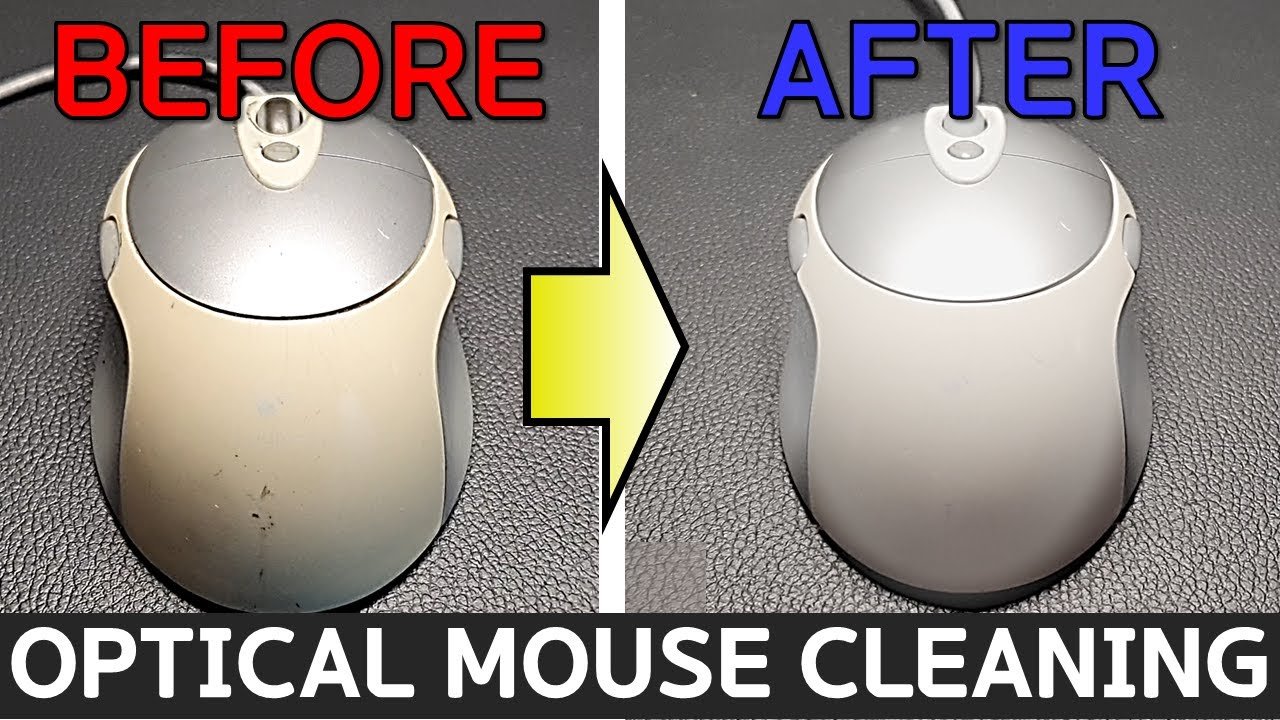
Example: Before And After Cleaning
Suppose your mouse cursor has been jumping across the screen. After cleaning the sensor window with a cotton swab and blowing out dust from the scroll wheel, the mouse tracks smoothly again—no need to buy a new one.
How Often Should You Clean?
Frequency depends on your environment and usage.
- Office or home use: Every 2-4 weeks.
- Shared or public computers: Weekly cleaning recommended.
- After eating at your desk: Clean immediately to avoid sticky residue.
For heavy gamers or designers, cleaning more often can prevent performance drops during crucial moments.
Mistakes To Avoid
Many beginners damage their mouse by cleaning incorrectly. Here are the most common mistakes:
- Using too much liquid: Liquids can seep inside and damage electronics.
- Applying liquid directly: Always put it on a cloth or swab first.
- Using abrasive tools: Scratches can ruin the sensor or surface.
- Forcing open the case: Can break snaps or void warranty.
- Skipping unplug/power off: Risk of short circuits or accidental clicks.
Practical Tips For Long-term Maintenance
- Wash your hands before using your mouse, especially after eating.
- Keep your desk clean to reduce dust and crumbs.
- Use a mouse pad—it keeps dirt away from the sensor and gives smoother tracking.
- Store your mouse in a case or drawer when not in use, especially during travel.
- Replace worn-out feet: The small pads under the mouse wear down. Replace them to keep movement smooth.
Comparing Cleaning Frequency And Methods
Here’s a look at how often different cleaning methods are recommended based on usage:
| Usage Type | Surface Cleaning | Sensor Cleaning | Deep/Internal Cleaning |
|---|---|---|---|
| Light Office Use | Monthly | Every 2-3 months | Yearly |
| Heavy Gaming | Weekly | Monthly | 6 months |
| Shared Computers | Weekly | Every 1-2 months | Yearly or as needed |
Why Mouse Cleaning Is Often Overlooked
Many users assume that because an optical mouse has no moving ball, it doesn’t need cleaning. In reality, the open sensor and frequent hand contact make it just as prone to problems. Some gaming mice cost over $100—a simple cleaning routine protects this investment.
Non-obvious insight: Even new mice can benefit from cleaning. Factory oils or packaging residue sometimes remain on the sensor or buttons, causing early problems.
Credit: www.protoarc.com
When To Replace Instead Of Clean
There are times when cleaning won’t fix the issue. If your mouse:
- Still skips or double-clicks after careful cleaning,
- Has visible cracks or worn-out switches,
- Feels rough even after replacing the feet,
…it may be time for a new one. Modern mice last for years with care, but every device wears out eventually.
Additional Resources
For more information on the science behind optical mice, you can read the detailed explanation on the Wikipedia Computer Mouse page.
Frequently Asked Questions
How Do I Clean Sticky Mouse Buttons?
First, unplug or turn off your mouse. Use a cotton swab dampened with isopropyl alcohol to gently clean around the button edges. Press the button repeatedly to work any debris out. For severe stickiness, you may need to open the mouse, but this is advanced and can void the warranty.
Is It Safe To Use Water To Clean My Optical Mouse?
Small amounts of water are safe on the exterior if you use a damp (not wet) microfiber cloth. Never let water enter the sensor window, scroll wheel, or inside the mouse. Isopropyl alcohol is safer because it evaporates quickly.
My Mouse Still Skips After Cleaning The Sensor. What Should I Do?
Try cleaning your mouse pad or desk surface—dirt here can interfere with tracking. Test the mouse on a white sheet of paper. If problems continue, the sensor itself may be damaged.
Can I Use Disinfectant Wipes On My Mouse?
Most disinfectant wipes are safe for the mouse’s exterior, but check for bleach or harsh chemicals. Always wring out excess liquid from the wipe and avoid the sensor, scroll wheel, or openings.
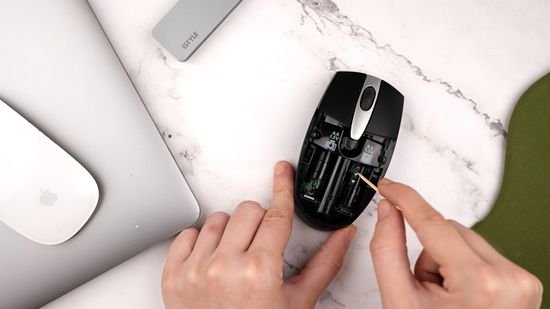
How Do I Clean A Wireless Mouse’s Battery Contacts?
Remove the batteries and use a dry cotton swab to clean off dust or corrosion. For stubborn corrosion, a swab dipped in a tiny bit of vinegar can help, followed by a dry swab.
Keeping your optical mouse clean isn’t just about looks—it’s about performance, hygiene, and comfort. With just a few minutes each month, you can enjoy smooth tracking and reliable clicks for years to come.
Related Office Guides
Continue with these related workspace guides:
