Printer Head Cleaning Guide
If your prints look faded, have streaks, or missing colors, you’re not alone. Printer head cleaning is a common task for anyone who uses inkjet printers. Many people don’t realize how important clean printer heads are for sharp, clear prints. Over time, ink can dry up or clog the tiny holes in the printer head, causing problems. Whether you print photos, documents, or labels, a dirty printer head can ruin your work and waste ink. But with the right steps, you can fix most issues without calling a professional or buying a new printer.
This guide explains everything you need to know about cleaning printer heads. You’ll learn why cleaning is important, how to spot problems early, different cleaning methods, and how to keep your printer working well. Even if you’re new to printers, you’ll find simple instructions and practical advice.
Let’s get started and make sure your prints always look their best.
Understanding Printer Heads
Printer heads are the parts of inkjet printers that spray tiny drops of ink onto paper. Each head has many small nozzles—sometimes hundreds or thousands. When these nozzles get blocked by dried ink, dust, or paper fibers, the print quality drops. You might see lines, faded areas, or even missing colors. There are two main types of printer heads:
- Fixed printer heads: Built into the printer and not easily replaceable.
- Replaceable printer heads: Part of the ink cartridge or a separate unit.
Knowing which type you have helps you choose the right cleaning method. Fixed heads often need careful cleaning, while replaceable heads can sometimes be swapped out if cleaning fails.
Common Signs Of A Dirty Printer Head
You can usually spot printer head problems by looking at your prints:
- Streaks or lines: Straight lines across the page, often missing color.
- Faded prints: Colors look lighter or washed out.
- Missing colors: One color is completely gone from the print.
- Blotches or smudges: Ink pools or smears on the paper.
If you see any of these, your printer head likely needs cleaning.
Why Printer Heads Get Dirty
Printer heads get dirty for several reasons. The most common causes are:
- Infrequent use: If you don’t print often, ink dries up inside the nozzles.
- Low-quality ink: Cheap or incompatible ink can leave residue.
- Environmental dust: Dust and paper fibers can stick to the head.
- Long print runs: Printing many pages in a row can cause ink buildup.
Regular cleaning prevents bigger problems and extends the life of your printer.
Automatic Vs. Manual Cleaning
Most modern printers have a built-in cleaning function. This is the easiest way to start. But sometimes, you need to clean the printer head manually for better results. Let’s compare both methods.
| Cleaning Method | Ease | Effectiveness | Risk |
|---|---|---|---|
| Automatic Cleaning | Very Easy | Moderate | Low |
| Manual Cleaning | Requires Effort | High | Medium |
Automatic Cleaning
With automatic cleaning, the printer pushes extra ink through the nozzles to clear blockages. You usually start this from the printer’s menu or software. It’s simple and safe, but it uses a lot of ink. If the problem is minor, this method works well.
Manual Cleaning
Manual cleaning is needed if automatic cleaning doesn’t fix the issue. You use cleaning solutions and soft cloths to remove dried ink. This method is more effective for stubborn clogs but requires care to avoid damage.
Step-by-step: Automatic Printer Head Cleaning
Most printers make cleaning easy. Here’s how to do it:
- Check your printer manual: Find the cleaning function. It’s usually in the menu, under “Maintenance” or “Tools.”
- Start the cleaning cycle: Select “Clean Print Head” or a similar option.
- Wait for the process to finish: The printer will make noises as it pushes ink through the nozzles.
- Print a test page: Look for improvements. If the print is still bad, repeat the cleaning cycle once or twice.
- Don’t repeat too often: Excessive cleaning wastes ink and can damage the printer head.
If your printer doesn’t improve after several cycles, move to manual cleaning.
Step-by-step: Manual Printer Head Cleaning
Manual cleaning works for deeper clogs. Here’s a safe way to do it:
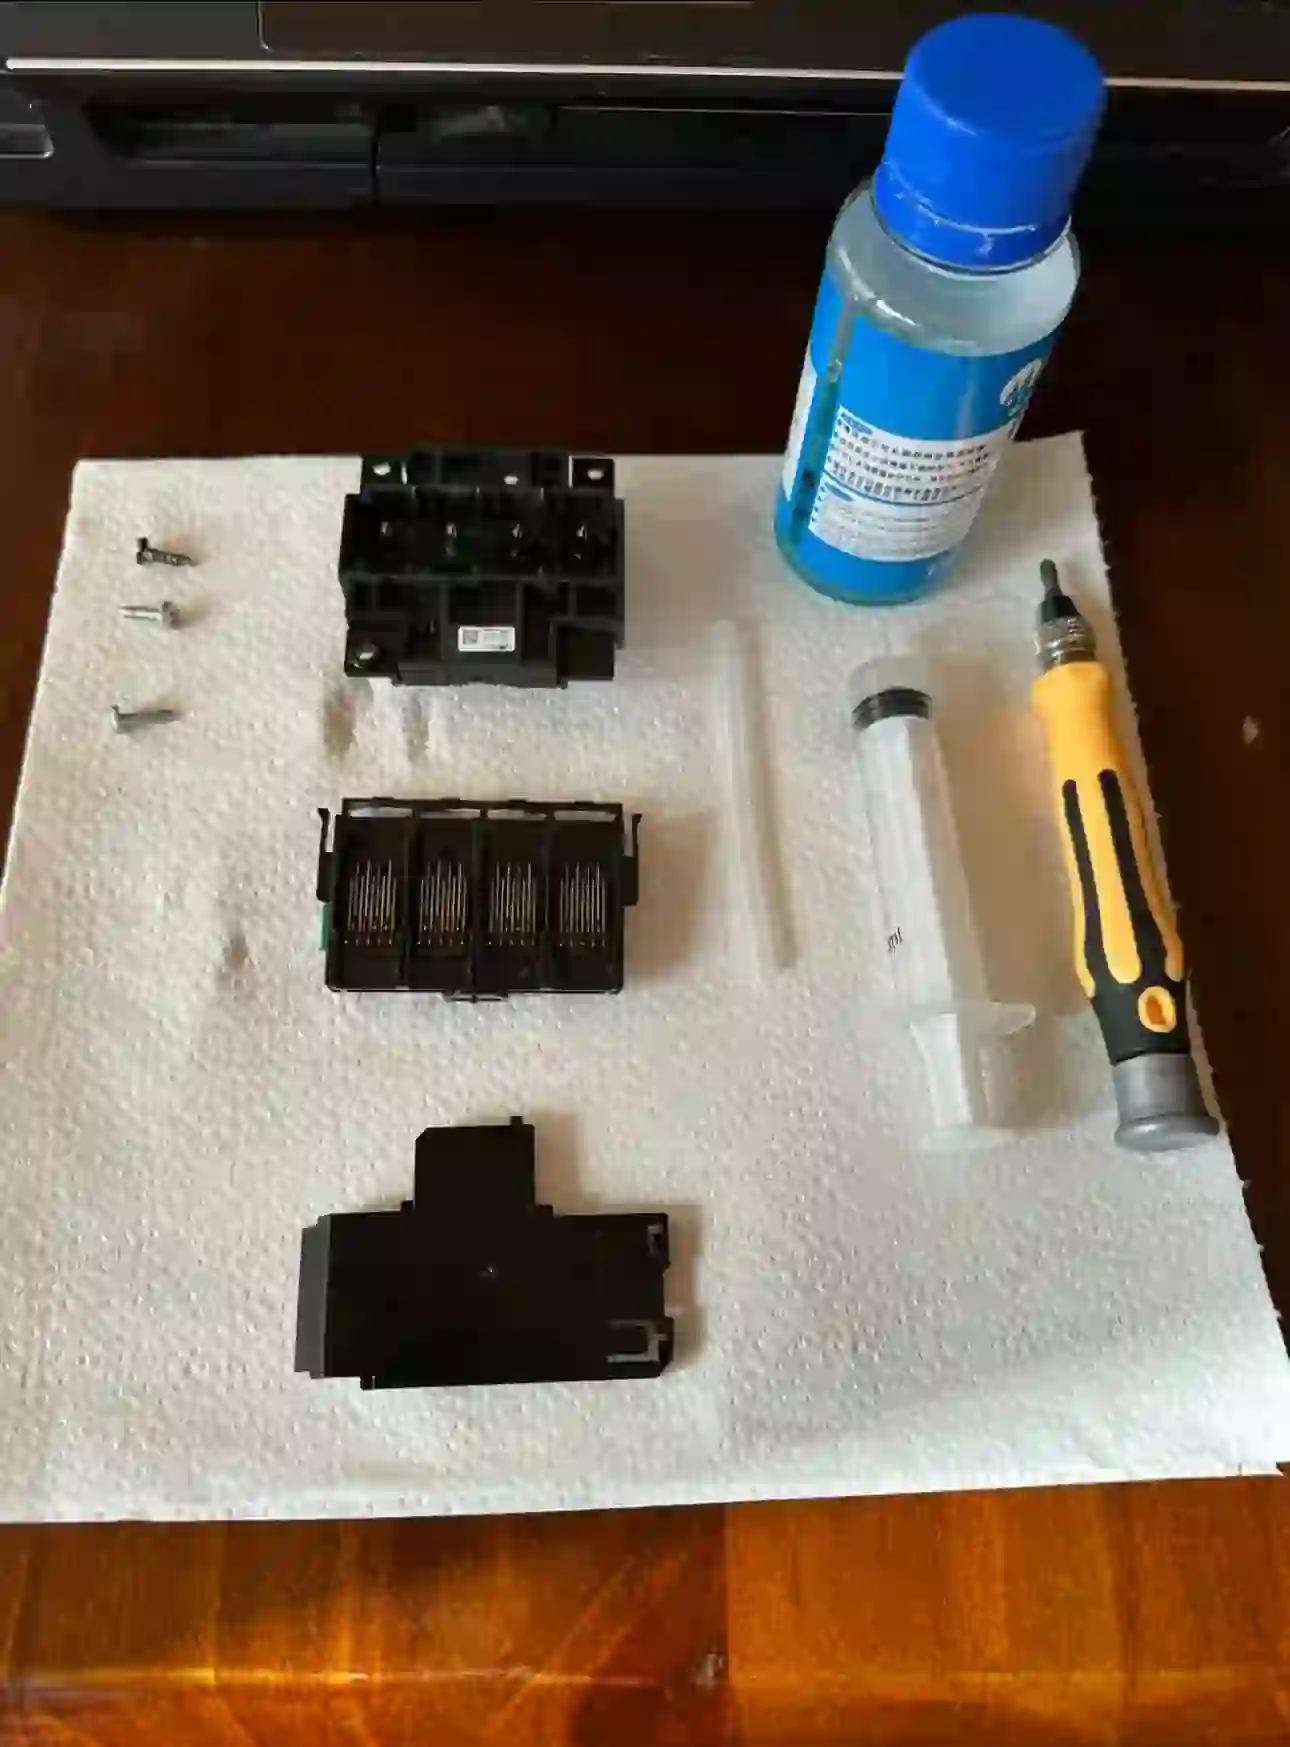
What You’ll Need
- Lint-free cloth
- Distilled water (never tap water)
- Cotton swabs
- Isopropyl alcohol (90% or higher)
- Cleaning solution (optional, made for printers)
Cleaning Removable Printer Heads
Many ink cartridges have built-in heads. Here’s how to clean them:
- Turn off and unplug your printer: Safety first.
- Remove the ink cartridge: Follow your printer’s instructions.
- Wipe the head gently: Use a lint-free cloth dampened with distilled water.
- Clean stubborn clogs: Dip a cotton swab in isopropyl alcohol and gently rub the nozzles.
- Let the cartridge dry: Wait at least 30 minutes.
- Reinstall the cartridge: Put it back and run an automatic cleaning cycle.
- Print a test page: Check for improvement.
Cleaning Fixed Printer Heads
Fixed heads are harder to access. Here’s what to do:
- Open the printer cover: Locate the printer head.
- Move the head into service position: Some printers allow manual movement.
- Dampen a cloth with distilled water: Gently wipe the exposed nozzles.
- Apply cleaning solution: If available, use a special printer head cleaner.
- Use a syringe for deep clogs: Some users gently flush the head with distilled water using a syringe (be careful not to use too much force).
- Let the head dry: Never reinstall while wet.
- Restart the printer and run a cleaning cycle: This helps clear any loose debris.
Practical Tips
- Never use tap water: Minerals can damage the head.
- Avoid rough materials: Only use soft, lint-free cloths.
- Don’t touch electronic contacts: This can cause printer errors.
- Be patient: Deep clogs may need several gentle cleanings.
Credit: www.youtube.com
Choosing The Right Cleaning Solution
You can buy special printer head cleaning solutions. These are made to dissolve dried ink safely. If you use isopropyl alcohol, make sure it’s pure (90% or higher). Some cleaning solutions also protect the head from corrosion.
Comparison: Common Cleaning Fluids
| Cleaning Fluid | Availability | Effectiveness | Safety |
|---|---|---|---|
| Distilled Water | Easy | Good | Very Safe |
| Isopropyl Alcohol | Easy | Very Good | Safe |
| Commercial Cleaner | Medium | Excellent | Safe if used correctly |
If you’re unsure, distilled water is always a safe choice. Some commercial cleaners are expensive but work faster.
How Often Should You Clean Printer Heads?
There’s no universal schedule. The right frequency depends on how often you print and your environment:
- Frequent printing: Clean heads every 2-3 months.
- Occasional printing: Clean before long breaks or after visible problems.
- Dusty rooms: Clean more often to avoid buildup.
Don’t clean too often, as it uses ink and can wear out the head. Only clean when you see problems or after a long pause in printing.
Preventing Printer Head Clogs
You can avoid most clogs with simple habits:
- Print regularly: Even one page every week keeps ink flowing.
- Use quality ink: Cheap inks cause more residue.
- Store printer in a clean place: Keep dust away.
- Turn off properly: Use the printer’s power button, not just unplugging.
- Replace cartridges before they’re empty: Running dry can cause air bubbles and clogs.
- Cover your printer: Use a dust cover when not in use.
Many users ignore these steps and face frequent clogs. Regular use and good ink are the biggest factors.
Advanced Cleaning Methods
Sometimes, regular cleaning isn’t enough. Here are advanced methods for tough cases:
Soaking The Printer Head
If ink is badly dried, soaking the head can help.
- Remove the printer head (if possible).
- Place it in a shallow dish with distilled water or cleaning solution.
- Let it soak for several hours (overnight for severe clogs).
- Dry completely before reinstalling.
This method works well for stubborn blockages, but only for removable heads.
Using A Syringe Or Vacuum Tool
Special tools can push cleaning fluid through the nozzles:
- Syringe method: Attach a small tube and gently push distilled water through the head.
- Vacuum tool: Sucks out dried ink, sold by printer repair shops.
These tools require care. Too much force can damage the head.
Professional Cleaning
If you can’t clear the clog, take your printer to a service center. Professionals have tools and experience. For expensive printers, this is often cheaper than buying a new device.
Troubleshooting: When Cleaning Doesn’t Work
Sometimes, cleaning fails to fix print quality. Here’s what to check:
- Cartridge is empty or faulty: Replace with a new cartridge.
- Electronic contacts are dirty: Clean with a dry, lint-free cloth.
- Printer head is damaged: If the head is scratched or corroded, it may need replacement.
- Software problems: Update printer drivers or reset the printer.
Often, beginners miss these issues and keep cleaning without results. If your prints don’t improve, check these factors.
Safety Precautions
Printer heads are delicate. Follow these safety tips:
- Unplug the printer before cleaning.
- Avoid touching the nozzles directly: Oils from your fingers can block them.
- Don’t use harsh chemicals: Only use recommended cleaning solutions.
- Handle cartridges gently: Dropping or shaking them can cause leaks.
- Keep cleaning fluids away from electronics: Moisture can cause short circuits.
Most printer problems come from rough handling or wrong cleaning fluids. Take your time and be gentle.
Inkjet Vs. Laser Printer Cleaning
Laser printers use toner, not ink, and don’t have printer heads in the same way. Cleaning a laser printer usually means removing dust and toner residue, not unclogging nozzles. Here’s how the two compare:
| Printer Type | Cleaning Needed | Method |
|---|---|---|
| Inkjet | Head Cleaning | Automatic/Manual with fluids |
| Laser | Dust Removal | Wipe, vacuum, replace drum |
If you have a laser printer, you don’t need to worry about printer head cleaning. Focus on keeping the inside dust-free.
Real-world Examples
Let’s look at two examples:
Example 1: Home Printer
Sarah prints photos once a month. She noticed faded colors and lines on her prints. She ran two automatic cleaning cycles, but the problem didn’t improve. She then removed the cartridge and gently cleaned it with distilled water and a cotton swab.
After reinstalling and running one more cleaning cycle, her prints returned to normal.
Insight: Many people don’t realize that waiting too long between prints lets ink dry. Regular use is the best prevention.
Example 2: Office Printer
A busy office printer started producing prints with missing colors. The IT team tried automatic cleaning, but the issue persisted. They used a commercial cleaning solution and a syringe to flush the head. This fixed the clog, and the printer worked as new.
Insight: Offices often use printers heavily, which can cause ink buildup. Advanced cleaning tools are sometimes needed.
Printer Head Cleaning Myths
There are several common myths about printer head cleaning:
- Myth 1: Tap water is fine for cleaning.
Tap water contains minerals that can block nozzles.
- Myth 2: Cleaning heads too often is good.
Excessive cleaning wastes ink and wears out parts.
- Myth 3: All printer heads are replaceable.
Many printers have fixed heads that can’t be easily swapped.
- Myth 4: Any alcohol will work.
Only pure isopropyl alcohol (90%+) is safe. Other types may damage parts.
Understanding these myths helps avoid mistakes and saves money.
Cost Of Printer Head Cleaning
Cleaning printer heads is usually inexpensive. Most supplies cost less than $20, and regular cleaning prevents expensive repairs. Professional cleaning costs $50–$100, depending on the printer. Replacing a printer head can cost $30–$150, depending on the model.
Tip: Investing in good ink and cleaning supplies saves money in the long run.
Credit: www.sunavin.com
Printer Head Cleaning For Popular Brands
Different brands have different cleaning instructions. Here’s a quick overview:
- HP: Most models have easy automatic cleaning. Manual cleaning is possible for cartridges.
- Canon: Offers deep cleaning cycles. Manual removal of heads is possible on some models.
- Epson: Advanced cleaning functions, but heads are often fixed. Use care when cleaning manually.
- Brother: Most heads are built-in. Automatic cleaning works well, but stubborn clogs need professional help.
Always check your printer’s manual for brand-specific advice.
Environmental Impact
Printer head cleaning uses ink and cleaning fluids. Ink cartridges are a big source of plastic waste. Choose refillable cartridges and eco-friendly cleaning solutions when possible. Don’t pour cleaning fluids down the drain; dispose of them safely.
Where To Find Printer Head Cleaning Products
You can find cleaning kits at office supply stores, online retailers, or from printer manufacturers. Choose products with good reviews and clear instructions. For more information on printer maintenance, see Wikipedia: Inkjet Printing.
Frequently Asked Questions
How Do I Know If My Printer Head Is Clogged?
If your prints have missing lines, faded colors, or blotches, your printer head is probably clogged. Running a nozzle check or printing a test page can confirm the issue.
Can I Use Tap Water To Clean Printer Heads?
No. Tap water contains minerals that can block the nozzles. Always use distilled water or special cleaning solutions.
How Often Should I Clean Printer Heads?
Clean heads when you see print quality problems, after long breaks, or every few months if you print often. Avoid cleaning too often, as it uses ink and can cause wear.
Is Manual Cleaning Safe For All Printers?
Manual cleaning is safe if you follow instructions and use proper supplies. Some printer heads are delicate or hard to access; check your manual before cleaning.
What Should I Do If Cleaning Doesn’t Fix My Print Quality?
If cleaning fails, check for empty cartridges, dirty contacts, or damaged printer heads. Try updating your printer software. If problems persist, contact a professional.
Keeping your printer head clean is the key to great prints and a long-lasting machine. With regular care and the right techniques, you’ll avoid most common printing problems. Take time to check your printer, use good ink, and follow these steps.
Your printer will thank you, and your documents and photos will always look sharp.
Credit: files.support.epson.com
Related Office Guides
Continue with these related workspace guides:
