Many people rely on printers every day, but few understand the importance of keeping the printer drum clean. If you notice streaks, faded prints, or smudges on your documents, a dirty drum could be the cause. The drum is a key part of laser printers. It transfers toner to paper, helping produce clear text and sharp images. Over time, toner dust, paper fibers, and dirt build up on the drum surface, causing print quality to drop. Regular cleaning is not only good for your printer’s health but also saves money by extending the drum’s life and reducing the need for repairs.
This guide covers everything you need to know about printer drum cleaning. You will learn why it matters, how to do it step by step, what tools you need, and how to spot problems before they cause big issues. Whether you are a home user, student, or office worker, you’ll find practical tips that make a real difference.
What Is A Printer Drum And Why Is It Important?
The printer drum is a cylinder-shaped part inside a laser printer. Its main job is to receive an image from the laser and transfer toner (powder ink) onto the paper. Without the drum, the printer cannot put text or pictures on a page. Most drums are made from a metal core covered with a photosensitive layer.
A clean drum is essential for these reasons:
- Print quality: Dirt or toner on the drum leads to lines, blotches, or faded areas.
- Longevity: A dirty drum wears out faster, costing more in replacements.
- Reliability: Clean drums mean fewer jams and less downtime.
A surprising fact: about 70% of print quality issues in laser printers are linked to drum or toner problems, not the printer itself.
Signs Your Printer Drum Needs Cleaning
You don’t have to be an expert to spot trouble. Watch for these common warning signs:
- Streaks or lines running down the page.
- Gray background or shadowing behind text and images.
- Faded areas where toner doesn’t stick well.
- Repeating marks at regular intervals (every few inches).
- Smudges that don’t wipe off the paper.
These problems usually mean the drum is dirty, though sometimes a bad toner cartridge or other part could also be to blame. Most printers show a warning light or error message when drum maintenance is needed.
Tools And Supplies Needed For Cleaning
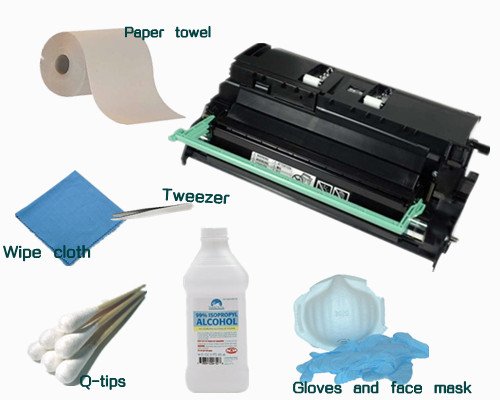
Gather these items before you start:
- Lint-free cloths (microfiber is best)
- Isopropyl alcohol (90% or higher)
- Soft brush (like a small paintbrush)
- Compressed air canister
- Latex or nitrile gloves (to avoid fingerprints)
- Face mask (if sensitive to dust)
- Cotton swabs
Never use paper towels or rough cloths, as they can scratch the drum.
Safety Tips Before You Begin
Cleaning a printer drum is safe if you follow simple rules:
- Turn off and unplug the printer. Wait at least 10 minutes for parts to cool.
- Work in a well-ventilated area.
- Avoid touching the drum surface with bare hands. Oils from skin can harm it.
- Handle toner carefully. Inhaling toner powder can cause irritation.
- Always check your printer’s manual for specific advice, as designs vary.
Step-by-step Printer Drum Cleaning Guide
Ready to clean? Follow these steps carefully for the best results.
1. Access The Drum Unit
Open the printer’s front or top cover. Remove the toner cartridge carefully (most cartridges sit on top of the drum unit). Place it on a clean, safe surface.
Next, take out the drum unit. In some printers, the drum and toner are combined. If so, follow the manual to separate them.
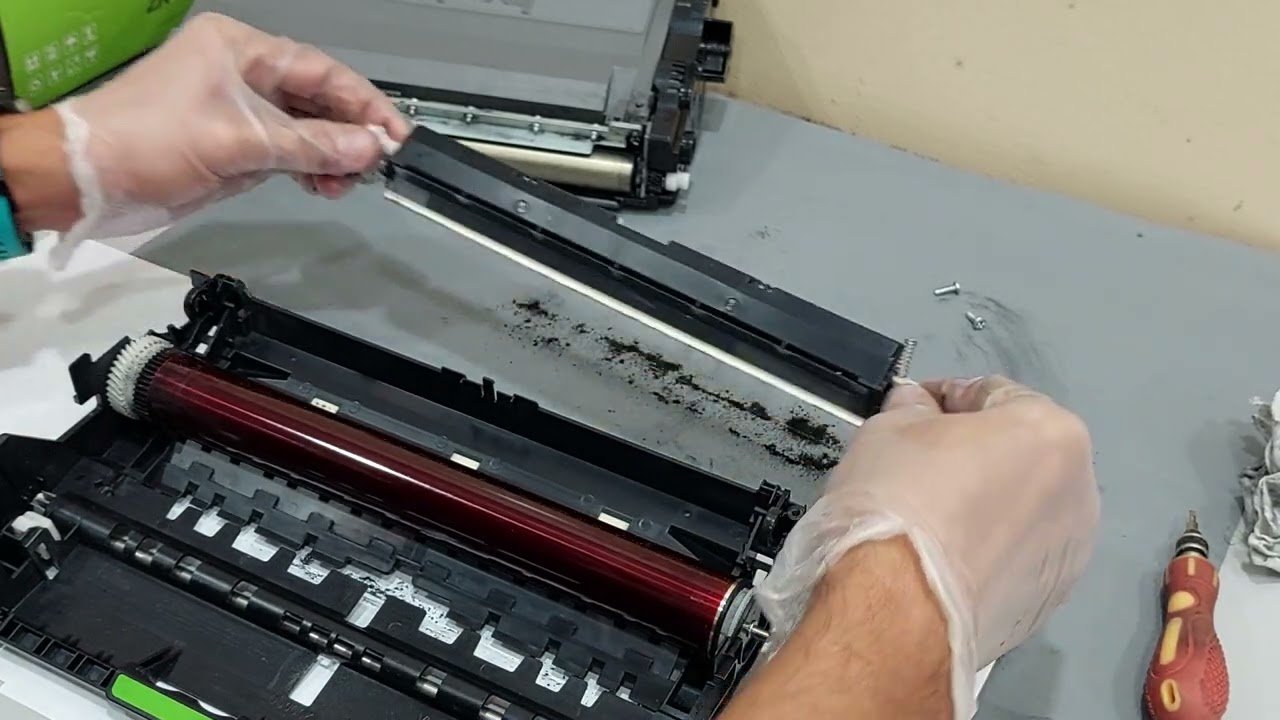
2. Inspect The Drum
Hold the drum up to the light. Look for toner build-up, dust, or marks on the shiny surface. Rotating the drum gently by its ends (never touch the surface!) Helps you see all sides.
3. Remove Loose Dust And Toner
Use the compressed air canister to blow off loose particles. Hold the drum over a trash bin and spray short bursts. Do not shake the can or use too much pressure.
With a soft brush, gently sweep away any remaining dust.
4. Clean The Drum Surface
Dampen a lint-free cloth with a small amount of isopropyl alcohol. Wipe the drum gently in one direction (not back and forth). If there are stubborn spots, use a cotton swab moistened with alcohol to clean them.
Never soak the drum or let liquid drip inside.
5. Let The Drum Dry
Leave the drum in a dust-free spot for at least 5 minutes. Make sure it is fully dry before reinstalling.
6. Reassemble And Test
Put the drum back in the printer, then the toner cartridge. Close the printer and plug it in. Print a test page to check if the cleaning solved the problem.
If print quality is still poor, repeat the cleaning or check for other issues.
How Often Should You Clean Your Printer Drum?
How often you clean depends on how much you print and your environment. For most home and small office users, cleaning every 3 to 6 months is enough. High-volume printers or dusty areas may need monthly cleaning.
Some newer printers have self-cleaning cycles, but manual cleaning is still helpful for stubborn dirt.
Credit: www.youtube.com
Common Mistakes To Avoid
Many people make these errors when cleaning the drum:
- Using harsh chemicals or household cleaners (they damage the drum).
- Touching the drum surface (leaves oil, causes smudges).
- Using rough cloths or paper towels (causes scratches).
- Not letting the drum dry fully before reassembly.
- Applying too much pressure while cleaning.
One tip beginners often miss: Always check for protective seals or tabs on new drum units. Failing to remove them can cause immediate print problems.
Comparing Drum Cleaning Methods
There are a few ways to clean a printer drum. Here’s how they stack up:
| Method | Effectiveness | Risk Level | Cost |
|---|---|---|---|
| Manual Cleaning (cloth + alcohol) | High | Medium | Low |
| Compressed Air Only | Medium | Low | Low |
| Automatic Printer Cycle | Low-Medium | Very Low | None |
| Professional Service | Very High | Very Low | High |
Manual cleaning is the most effective for stubborn dirt, but requires care. Automatic cleaning is safest but may not remove all build-up.
How Drum Cleaning Compares To Other Printer Maintenance
Cleaning the drum is only one part of printer care. Other tasks include replacing toner, cleaning rollers, and updating software. Here’s a quick comparison:
| Maintenance Task | Frequency | Impact on Print Quality |
|---|---|---|
| Drum Cleaning | 3–6 months | Very High |
| Toner Replacement | As needed | High |
| Roller Cleaning | 6–12 months | Medium |
| Firmware Update | Yearly | Low |
Ignoring drum cleaning is a leading cause of poor-quality prints, even when toner is new.
When To Replace The Drum Instead Of Cleaning
No drum lasts forever. Even with good cleaning, the photosensitive coating wears out. Here’s how to know it’s time for a new drum:
- Cleaning no longer improves print quality.
- Repeating marks at fixed intervals, even after cleaning.
- Printer displays a “replace drum” warning.
- Drum is scratched, chipped, or dented.
Most drums last between 10,000 and 50,000 pages. Check your printer’s manual for a specific number.
Practical Tips For Better Drum Care
- Always use high-quality toner. Cheap or fake toner can clog the drum.
- Store toner and drums in a cool, dry place. Heat and humidity damage the drum surface.
- Avoid printing in very dusty rooms.
- Print a test page after cleaning to spot issues early.
- If possible, use the printer’s built-in cleaning cycle before manual cleaning.
- Keep a record of cleaning dates for each printer.
An insight many miss: Even if you don’t print often, dust can settle inside your printer. So, occasional cleaning is important even for light users.
Environmental Impact Of Drum Maintenance
Proper drum cleaning and care help the environment in two ways:
- Reduces waste by extending drum life, so fewer end up in landfills.
- Saves resources by preventing early replacement and lowering demand for new parts.
Many companies now offer drum recycling programs. Check with your printer brand for options.
Credit: blog.123ink.ca
Troubleshooting: What If Cleaning Doesn’t Help?
If cleaning the drum does not fix print problems:
- Check the toner cartridge. Sometimes, poor toner causes similar issues.
- Inspect other parts like fuser rollers or transfer belts.
- Make sure all parts are installed correctly.
- Look for software or firmware updates for your printer.
- If problems continue, the drum may be at the end of its life.
For complex issues, consider contacting a professional or the printer maker’s support line. The official HP Support page has useful troubleshooting steps for many printer models.
Frequently Asked Questions
What Happens If I Never Clean The Printer Drum?
If you skip drum cleaning, you will likely see more streaks, smudges, and faded prints over time. The drum can wear out faster, meaning you’ll need to replace it sooner. Print jobs may also jam more often.
Can I Clean The Drum With Water Instead Of Alcohol?
No. Water can leave spots and may not remove toner or oil. Isopropyl alcohol dries quickly and is safe for the drum’s surface.
How Can I Tell If My Printer Has A Separate Drum Unit?
Check your printer’s manual or look inside the printer. In some models, the drum and toner are combined in one cartridge. In others, they are separate and can be removed individually.
Is It Safe To Use A Vacuum Cleaner To Clean The Printer Drum?
Only use a vacuum designed for toner dust. Regular household vacuums can cause static or blow dust into the air, which is not safe.
Will Drum Cleaning Void My Printer Warranty?
In most cases, gentle cleaning following the manufacturer’s guidelines will not void the warranty. However, damage from harsh chemicals or rough handling may not be covered. Always read your printer’s warranty terms.
Keeping your printer drum clean is one of the simplest ways to ensure sharp, reliable prints and avoid costly repairs. With the right tools and a few careful steps, you can handle most drum cleaning tasks yourself. Remember, a little maintenance goes a long way—your printer (and your wallet) will thank you.

Credit: www.tonerbuzz.com
Related Office Guides
Continue with these related workspace guides:
