Keeping your laptop cool is more important than most people realize. If your laptop vents are blocked or full of dust, your device can overheat, slow down, or even shut down unexpectedly. Overheating not only affects your laptop’s speed but can also shorten its lifespan.
Many users forget to clean the vents, thinking it’s not a big deal. But regular cleaning can prevent annoying problems, save money on repairs, and even keep your laptop running faster for longer.
This guide will show you everything you need to know about laptop vent cleaning. You’ll learn why it matters, how to do it safely, which tools to use, and how often you should clean the vents. You’ll also discover some clever tricks that most beginners miss and get answers to the most common questions. By the end, you’ll feel confident about keeping your laptop cool and healthy—no matter your tech skills.
Why Clean Your Laptop Vents?
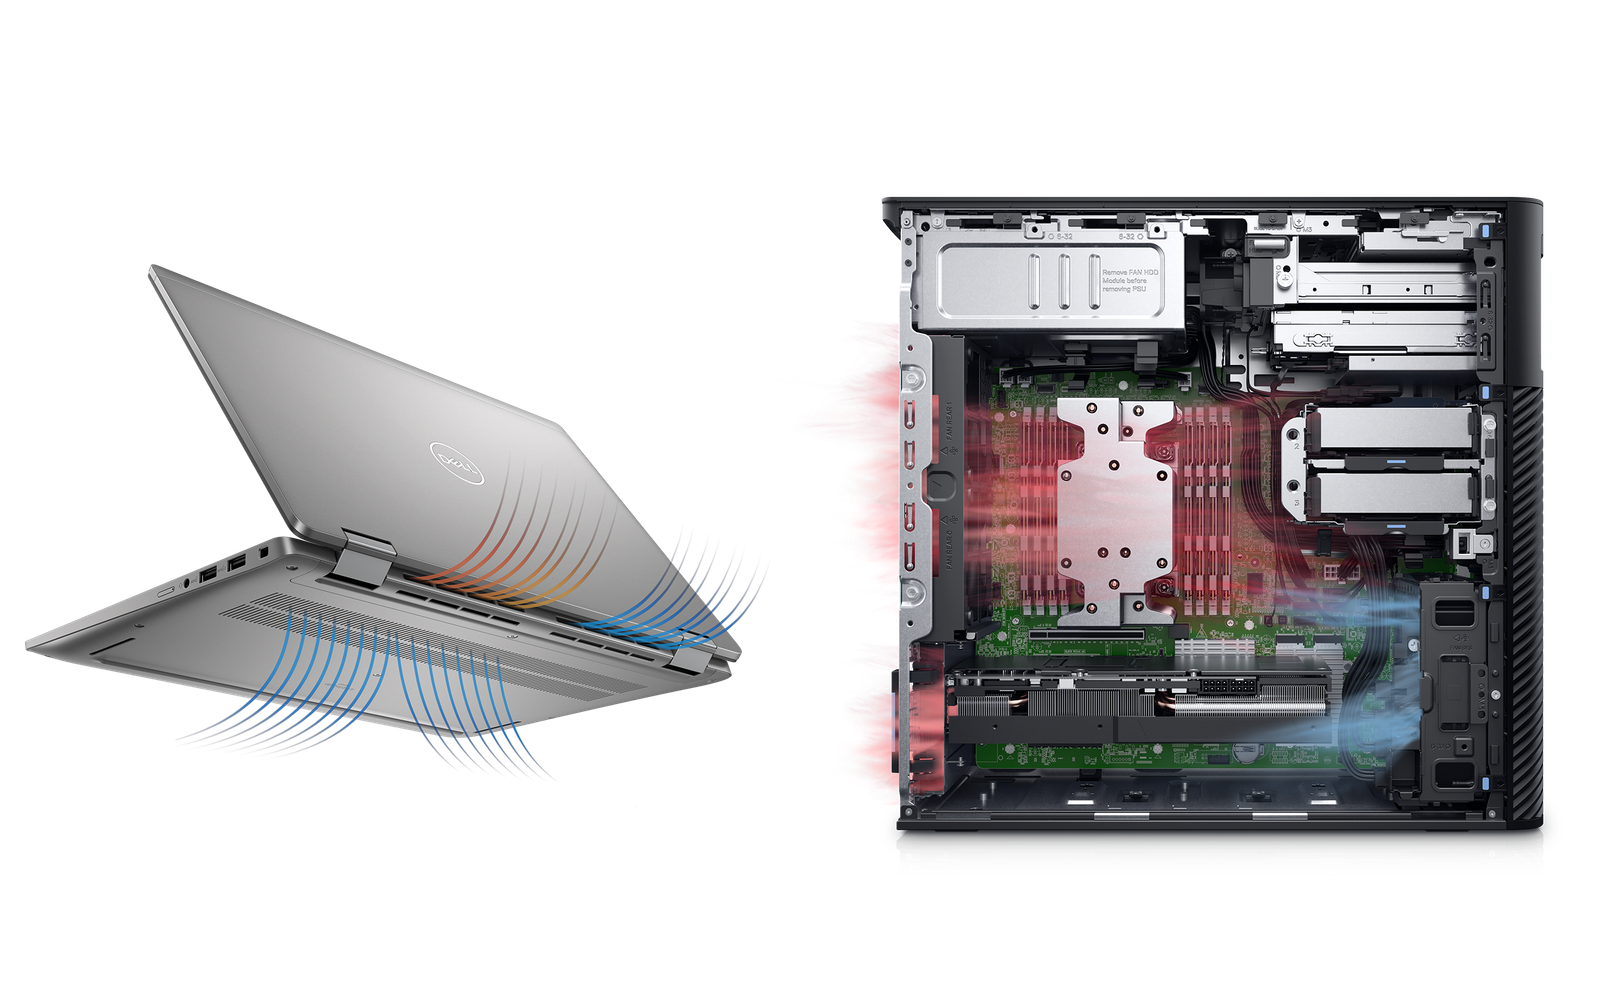
Laptop vents play a vital role in keeping your device cool. Inside your laptop, the CPU and GPU generate a lot of heat. The cooling system pulls air through the vents to carry this heat away. When dust and dirt clog the vents, less air can flow, causing the temperature inside to rise.
Over time, blocked vents can lead to:
- System overheating
- Random shutdowns
- Decreased performance
- Shorter hardware lifespan
- Louder fan noise
A study by PCWorld found that laptops with blocked vents can run up to 20°C hotter than clean ones. This extra heat can cause the processor to slow down automatically—a process called thermal throttling. In extreme cases, it can even damage internal components.
It’s not just about performance, either. Dust often carries bacteria, pollen, or even pet hair, which can affect air quality in your workspace. Keeping your vents clean isn’t just good for your laptop; it’s good for you, too.
Signs Your Laptop Vents Need Cleaning
Many people wait until their laptop has a problem before cleaning the vents. But there are some early signs you can watch for, including:
- Fan running loudly even when the laptop isn’t doing much
- Laptop feeling hot to the touch, especially around the keyboard or bottom
- Random shutdowns or restarts without warning
- Performance drops—programs lag or take longer to open
- Visible dust around the vent holes or fan grilles
If you notice any of these, it’s time to clean your laptop vents. Even if you don’t see obvious signs, regular cleaning (every few months) is a smart habit.
Tools And Supplies You’ll Need
Cleaning laptop vents is easier if you have the right tools. Here’s what you’ll need for a safe and thorough job:
- Compressed air can (the most popular tool)
- Soft brush (paintbrush or makeup brush)
- Microfiber cloth
- Small screwdriver (if you want to open the case)
- Vacuum cleaner with a small nozzle (optional)
- Cotton swabs (for tight spots)
- Isopropyl alcohol (at least 90%, only for deep cleaning)
- Anti-static wrist strap (if opening the case)
A can of compressed air is the safest option for most people. Never use a hairdryer or blow directly with your mouth—this can push moisture and saliva into your laptop, making things worse.
How To Clean Laptop Vents: Step-by-step Guide
Cleaning your laptop vents is not as difficult as it sounds. In most cases, you don’t need to open your laptop to clear dust from the vents. Here’s a step-by-step guide to help you through the process.
1. Turn Off And Unplug Your Laptop
Always shut down your laptop and unplug all cables before cleaning. If possible, remove the battery (for older models). This helps protect both you and your laptop from accidental shocks.
2. Move To A Clean, Well-lit Area
Find a workspace with good lighting. Place a soft cloth or towel on the table to protect your laptop from scratches.
3. Locate The Vents
Most laptops have vents on the sides, back, or bottom. Some models have intake vents underneath and exhaust vents on the sides. If you’re not sure, check your laptop’s manual or look up your model online.
4. Use Compressed Air To Blow Out Dust
Hold the can upright and use short bursts of air to blow dust out of the vents. Don’t hold the trigger down continuously—this can cause moisture to spray out. Keep the nozzle a few centimeters away from the vent to avoid damaging internal parts.
Tip: Blow air in the opposite direction of normal airflow to push dust out, not deeper inside.
5. Brush Away Stubborn Dust
If you see dust stuck around the vents, use a soft brush to gently loosen it. A makeup brush or small paintbrush works well. Brush gently to avoid scratching the surface.
6. Wipe The Outside
Use a microfiber cloth to wipe away any dust that lands on the outside of your laptop. Avoid using wet wipes or paper towels, as these can leave lint or moisture.
7. Deep Cleaning (optional): Opening The Case
If your laptop is running very hot and regular cleaning doesn’t help, you may need to open the case. Only do this if you’re comfortable and your laptop’s warranty allows it.
- Use a small screwdriver to remove the screws on the bottom panel.
- Carefully lift the panel and set it aside.
- Use compressed air and a brush to clean the internal fans and heatsinks.
- Be extra careful not to touch any internal parts with your hands.
- If you use isopropyl alcohol, apply it to a cotton swab (not directly on components).
When finished, replace the panel and screws, then reconnect the battery.
8. Optional: Vacuum Cleaner
Some people use a vacuum cleaner with a small nozzle to suck dust from vents. Only use this method if the vacuum is designed for electronics. Never use high suction, as this can damage delicate parts or create static electricity.
Comparing Cleaning Methods
The main ways to clean laptop vents are using compressed air, a brush, or a vacuum. Here’s a comparison of their pros and cons:
| Method | Pros | Cons | Best For |
|---|---|---|---|
| Compressed Air | Easy, effective, safe for most users | Can release moisture if misused, needs purchase | Regular home cleaning |
| Brush | Cheap, good for visible dust | Can push dust inside if not careful | Surface dust removal |
| Vacuum Cleaner | Picks up dust directly, no blowing | Risk of static, needs proper nozzle | Users with right tools |
How Often Should You Clean Laptop Vents?
The best cleaning schedule depends on your environment and usage. Here are some general guidelines:
- Every 3 to 6 months for most home users
- Monthly if you use your laptop in a dusty area, or have pets
- Before and after summer when temperatures rise
- When you notice signs of overheating or loud fans
If you smoke indoors or use your laptop on beds or carpets often, you may need to clean even more often. Dust and pet hair can build up quickly in these cases.
Credit: www.dell.com
Special Cleaning Tips Most People Miss
Some cleaning tricks can make a big difference in laptop care. Here are a few non-obvious insights that beginners often miss:
- Rotate cleaning angles: Blow air from different directions to loosen stubborn dust. Dust can stick to corners and fan blades, so changing the angle helps.
- Elevate your laptop: Place your laptop on a stand or hard surface while cleaning. This exposes the bottom vents and lets more dust fall out.
- Check hidden intake vents: Some laptops have small intake vents under the keyboard or hinge. These are easy to miss but can collect a lot of dust.
- Don’t forget the charger port: Dust can gather in the charging port, leading to connection problems. Use a cotton swab or brush to clean it gently.
- Monitor temperatures: Use free software like HWMonitor or Core Temp to check your laptop’s temperature before and after cleaning. A drop in temperature means your cleaning worked.
- Never spin the fan manually: When blowing air, avoid spinning the fan too fast with compressed air. Hold the fan still with a toothpick if needed. Fast spinning can damage the bearings.
Risks Of Not Cleaning Laptop Vents
Ignoring dusty vents can cause bigger problems than just noise. Here are some real risks:
- Permanent hardware damage: Overheating can damage the motherboard, battery, or SSD.
- Data loss: Sudden shutdowns can corrupt files or cause you to lose unsaved work.
- Reduced battery life: Heat wears out the battery faster.
- Shorter laptop lifespan: A hot laptop ages faster and will need replacing sooner.
- Warranty issues: Some manufacturers may void your warranty if they find dust buildup caused overheating.
Many users only clean their laptop after a problem appears. But by then, some damage may already be done. Prevention is much cheaper than repairs.
Deep Cleaning Vs. Quick Cleaning
Sometimes a surface cleaning isn’t enough. Here’s how to know if you need a deep clean:
- Laptop still runs hot after regular cleaning
- Fan noise doesn’t improve
- Visible dust stuck inside vents or fan blades
Deep cleaning means opening the laptop and cleaning inside. For some models, this is easy. For others, it can be tricky or risky.
Here’s a quick table to help you decide:
| Cleaning Type | Tools Needed | Time Needed | Skill Level |
|---|---|---|---|
| Quick Cleaning | Compressed air, brush, cloth | 5-10 minutes | Beginner |
| Deep Cleaning | Screwdriver, brush, air, wrist strap | 20-45 minutes | Intermediate/Advanced |
If you’re not comfortable opening your laptop, consider taking it to a professional for a deep clean once a year.
Cleaning Vents On Different Laptop Brands
Not all laptops are built the same. Here are some tips for popular brands:
- Apple MacBook: Most MacBooks have hidden vents along the hinge. Use compressed air carefully. Opening the case is difficult and may void the warranty.
- Dell and HP: Usually have vents on the sides and bottom. Many models are easy to open for deep cleaning.
- Lenovo ThinkPad: Vents often on the side and back. Bottom panel is usually simple to remove.
- Gaming laptops (Asus, Acer, MSI): Larger vents and fans. These models collect more dust, so clean more often.
Always check your user manual or the manufacturer’s website for safe cleaning instructions.
Credit: ca.norton.com
Cleaning Laptop Vents Without Compressed Air
If you don’t have compressed air, there are still ways to clean your vents:
- Use a soft brush to gently loosen and sweep away dust.
- Try a handheld air blower (manual squeeze type, like those for camera lenses).
- Use your vacuum cleaner with a small nozzle, but be cautious with static.
- For stubborn dust, use a cotton swab to reach inside the vent holes.
Never use liquids directly on your laptop. If you need to clean sticky spots, moisten the cloth or swab lightly with isopropyl alcohol and wipe gently.
How To Prevent Dust Buildup
Cleaning is only half the battle; prevention is the other half. Here’s how to keep your laptop cleaner for longer:
- Use your laptop on hard surfaces like a desk or table. Avoid using it on beds, carpets, or couches, which shed fibers and trap dust.
- Keep your workspace clean. Regularly dust your desk, especially if you have pets.
- Elevate your laptop with a stand or cooling pad. This improves airflow and reduces dust intake.
- Store your laptop in a case or bag when not in use.
- Avoid eating near your laptop. Crumbs attract dust and can clog vents.
- Consider an air purifier if you live in a dusty area.
A few simple habits can greatly reduce the need for frequent deep cleanings.
What If Cleaning Doesn’t Fix The Problem?
If your laptop still overheats or makes noise after cleaning the vents, other issues may be at play:
- Thermal paste between the CPU and heatsink may have dried out. This requires professional replacement.
- Fan failure: The internal fan may be broken or clogged beyond simple cleaning.
- Old hardware: Older laptops run hotter as their cooling systems wear out.
In these cases, it’s best to get a technician’s help. Regular cleaning prevents many problems, but not all.
Environmental Factors: How Your Surroundings Affect Dust
The amount of dust your laptop collects depends on your environment:
- Urban areas: More air pollution and fine dust
- Rural areas: More pollen, plant fibers, and pet hair
- Humid climates: Dust can clump and stick more
- Dry climates: Fine dust particles float easily
If you live in a high-dust area, check your vents more often. Placing your laptop away from open windows and doors also helps.
Professional Cleaning Vs. Diy
Some users worry about damaging their laptop during cleaning. Here’s a quick look at the pros and cons of professional vs. DIY cleaning:
| Option | Cost | Safety | Convenience | When to Choose |
|---|---|---|---|---|
| DIY Cleaning | Low | Safe if careful | Anytime at home | Regular maintenance |
| Professional Cleaning | Medium to high | Very safe | Requires visit | Deep cleaning or repairs |
For most users, DIY cleaning every few months and a professional clean once a year is a good balance.
Additional Resources
If you want to learn more about safe computer cleaning, you can read detailed guides and scientific studies at Wikipedia.
Credit: www.reddit.com
Frequently Asked Questions
How Do I Know If My Laptop Vents Are Blocked?
If your laptop feels hot, the fan runs constantly, or you notice dust around the vents, they may be blocked. Slow performance and sudden shutdowns are also signs. Regularly check and clean to prevent overheating.
Is It Safe To Use Compressed Air On My Laptop?
Yes, compressed air is safe if used correctly. Hold the can upright, use short bursts, and keep it a few centimeters from the vent. Don’t let liquid spray out, and avoid spinning the fan too fast.
Can I Use A Vacuum Cleaner To Clean Laptop Vents?
You can, but use caution. Only use a small nozzle and low suction. Avoid touching internal parts. Never use a regular household vacuum directly on your laptop, as it can create static electricity.
How Often Should I Clean My Laptop Vents?
Most users should clean vents every 3 to 6 months. If you have pets, live in a dusty area, or notice overheating, clean more often. Regular cleaning prevents many common laptop problems.
What If I Can’t Open My Laptop?
If your laptop is sealed or you’re not comfortable opening it, stick to surface cleaning with compressed air and a brush. For deep cleaning, visit a professional technician or authorized service center.
Taking care of your laptop vents is simple but powerful. With a few easy habits and regular cleaning, you can keep your device cool, fast, and reliable for years to come. Don’t wait for problems to appear—make vent cleaning part of your regular tech routine.
Related Office Guides
Continue with these related workspace guides:
