Keeping your laminator clean is not just about making it look good—it helps the machine last longer and work better. Many people use laminators for school, office, or creative projects. But after a while, you might notice streaks, spots, or wrinkles on your laminated sheets. Sometimes, the machine jams or makes strange noises. These are all signs that your laminator needs a good cleaning. If you ignore this, you may end up with damaged documents or even break your machine.
Cleaning a laminator may sound complicated, but it is easy if you know what to do. This article will show you every step, from gathering supplies to drying and testing your machine. You will also learn some expert tips, common mistakes to avoid, and how to keep your laminator in top shape for years.
Whether you have a pouch laminator or a roll laminator, you will find the answers here. Let’s get started on making your laminator work like new again.
Why Cleaning A Laminator Matters
A clean laminator works better and gives you smooth, clear documents. Dirt, adhesive, and plastic build up over time. If not removed, these can cause:
- Paper jams that waste your time and materials
- Uneven lamination with bubbles or wrinkles
- Streaks and marks on documents
- Overheating and machine damage
Regular cleaning also helps you avoid costly repairs or having to buy a new machine too soon. It keeps your laminator safe for everyone, especially in shared spaces like schools or offices.
Tools And Supplies You Need
Before starting, make sure you have these items:
- Lint-free cloth (microfiber is best)
- Isopropyl alcohol (at least 70%, for cleaning rollers)
- Rubber roller cleaning pads (optional, for heavy build-up)
- Cotton swabs (for small spaces)
- Soft brush or small vacuum (to remove dust)
- Laminator cleaning sheets (pre-moistened or dry, for pouch laminators)
- Protective gloves (to keep hands clean)
- Tweezers or small tongs (for removing stuck debris)
- Compressed air (optional, for hard-to-reach dust)
Most of these supplies are affordable and easy to find at office supply stores or online.
Safety First: Preparing The Laminator
Always start by turning off and unplugging your laminator. This keeps you safe from electric shock or burns. Let the machine cool down completely—this can take 30 minutes or more. Never try to clean a hot laminator.
Next, remove all paper and pouches from the feeder. If your machine has removable trays or covers, take these off too. Keep your workspace bright and organized so you do not lose any small parts.
Understanding Your Laminator Type
Laminators come in different types, and each needs a slightly different cleaning method. The two main types are pouch laminators and roll laminators.
| Laminator Type | Where Used | Common Cleaning Needs |
|---|---|---|
| Pouch Laminator | Home, small office, schools | Light adhesive, dust, paper debris |
| Roll Laminator | Print shops, copy centers, large offices | Heavy adhesive, melted plastic, large debris |
Check your machine’s manual for special instructions. Some laminators have self-cleaning features or special rollers that need care.
Step-by-step Guide: How To Clean Your Laminator
Let’s break down the cleaning process. Follow these steps for best results.
1. Surface Cleaning
Start by wiping the outside of the machine. Use a damp lint-free cloth with a small amount of mild soap if needed. Do not let water drip into the machine. This removes dust, fingerprints, and stray bits of plastic or paper.
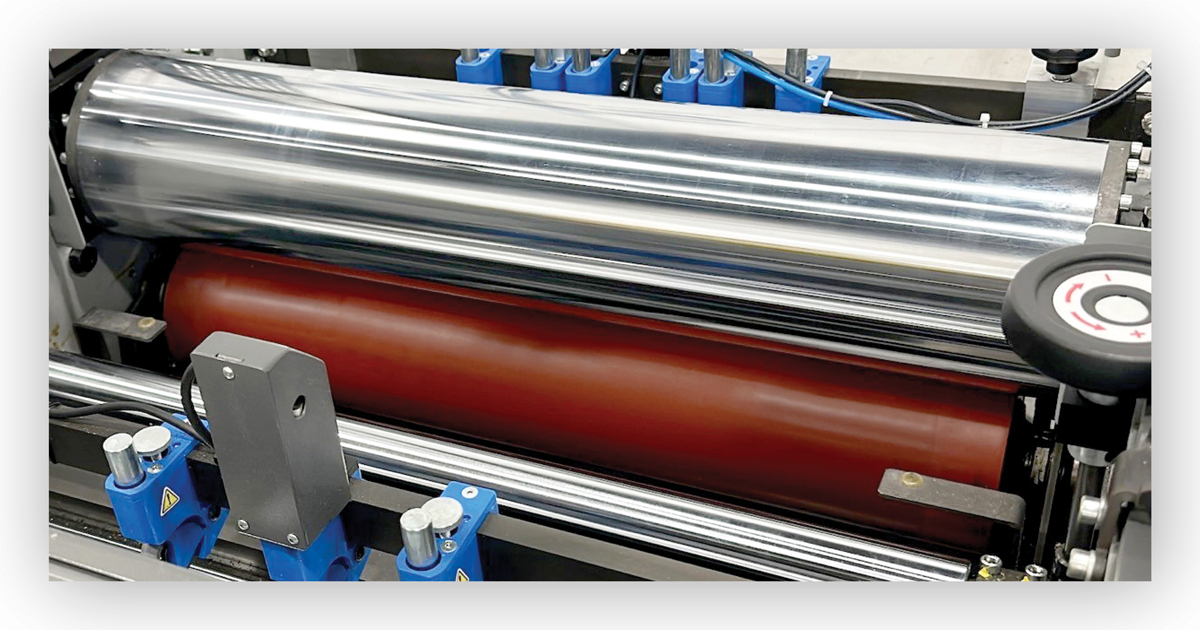
2. Cleaning The Rollers
The rollers are the most important part to clean. They move the pouch or film through the laminator. If they are dirty, your documents will not come out smooth.
For Pouch Laminators
- Use a laminator cleaning sheet. Run it through the machine just like you would a regular pouch. The sheet picks up sticky residue and dust.
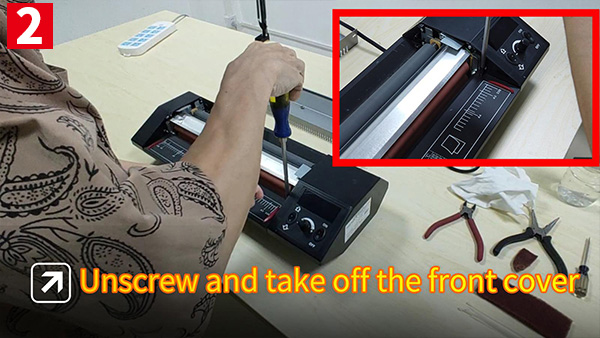
- For stubborn spots, turn off and unplug the machine. Open the cover if possible. Dampen a lint-free cloth with isopropyl alcohol and gently wipe the exposed rollers.
- Rotate the rollers by hand if needed to clean all sides.
For Roll Laminators
- Open the cover as shown in your manual.
- Use a rubber roller cleaning pad or a cloth with isopropyl alcohol.
- Wipe each roller thoroughly. Do not soak the rollers.
- Use cotton swabs for tight spaces.
3. Removing Stuck Plastic And Adhesive
Sometimes, bits of melted plastic or adhesive build up on the rollers or inside the machine.
- Wait until the machine is completely cool.
- Use tweezers or a wooden stick (never metal) to gently pick away loose debris.
- For stubborn glue, apply a little isopropyl alcohol and let it sit for a minute before wiping.
- Do not scrape hard or use sharp tools—this can damage the rollers.
4. Cleaning The Feeder And Exit Tray
Dust and bits of paper often collect in the feeder and exit tray.
- Use a soft brush or compressed air to remove loose particles.
- Wipe surfaces with a dry or slightly damp cloth.
5. Cleaning Sensors And Internal Parts
Some laminators have paper sensors or electronics inside.
- Only clean these if your manual says it is safe.
- Use a dry cotton swab or compressed air.
- Never spray liquid cleaners inside the machine.
6. Drying And Reassembly
After cleaning, let all parts dry for at least 10 minutes. Reattach any covers, trays, or parts you removed. Check that everything is in place before turning the machine back on.
7. Testing Your Laminator
Plug in the machine and run a test sheet through. Use a blank paper in a laminating pouch. Check for:
- Smooth movement through the rollers
- No streaks, wrinkles, or leftover debris
- Even lamination and good seal
If you still see problems, repeat the cleaning steps or check for damaged rollers.
How Often Should You Clean Your Laminator?
The right cleaning schedule depends on how often you use your machine.
| Usage Level | Recommended Cleaning |
|---|---|
| Light (1-2 times/week) | Once a month |
| Moderate (3-5 times/week) | Every 2 weeks |
| Heavy (daily or large batches) | Every week |
Always clean right away if you notice a jam, streaks, or after laminating sticky labels.
Credit: raysonstapler.com
Common Mistakes To Avoid
Many people make these errors when cleaning a laminator. Avoid them to keep your machine safe:
- Cleaning while hot: Always let your laminator cool completely. Cleaning hot rollers can burn you or spread melted adhesive.
- Using harsh chemicals: Stick to isopropyl alcohol or approved laminator cleaners. Bleach, acetone, or strong solvents can damage rollers and plastic parts.
- Scraping with metal tools: This scratches and ruins rollers. Always use plastic, wood, or cloth.
- Skipping the cleaning sheet: Running a laminator cleaning sheet prevents build-up, even if your machine looks clean.
- Ignoring the manual: Every laminator is different. Some have parts that must never be touched or cleaned with liquid. Always check the instructions.
- Forgetting to dry parts: Damp rollers can ruin your next lamination or cause electric problems.
- Overusing cleaning fluid: Too much liquid can seep inside and damage electronic parts.
Deep Cleaning And Troubleshooting
Sometimes, your laminator needs more than a quick wipe. Here is what to do for tougher problems.
When To Deep Clean
- Sticky build-up does not come off with a cleaning sheet
- Frequent jams or misfeeds, even after surface cleaning
- Burnt smell or visible melted film inside the machine
Steps For Deep Cleaning
- Unplug and cool the machine.
- Remove as many covers as possible (see the manual).
- Use isopropyl alcohol to gently wipe all exposed rollers and surfaces.
- Remove all visible debris with tweezers.
- Clean sensors and inside with compressed air.
- Let dry fully, then reassemble and test.
If problems continue, the rollers may need replacement or the machine may need a professional repair.
Credit: nobelusuniversity.com
Expert Tips To Keep Your Laminator In Top Shape
You can avoid most problems with a few good habits:
- Use cleaning sheets regularly. Run one through after every 10–20 uses.
- Let the machine cool before turning it off. This prevents film from sticking to rollers.
- Use good-quality pouches and film. Cheap materials leave more residue.
- Feed sheets straight. Crooked sheets can jam and leave glue on the rollers.
- Store your laminator covered when not in use. This keeps out dust and debris.
Two things many beginners miss: first, always check for leftover bits of pouch or label after every use. Even a small piece can melt and cause problems later. Second, never pull a jammed sheet backward through the feeder—this can break the rollers or sensors.
What To Do If You Have A Jam Or Melted Film
Jams and melted film are common, but you can fix most problems without panic.
- Turn off and unplug the machine right away.
- Let it cool completely.
- Open the cover and gently pull out the jammed sheet in the direction of normal travel.
- Use tweezers to remove any melted film stuck to the rollers.
- Clean with isopropyl alcohol if needed, then test again.
If the jam will not clear, call a technician or check the manufacturer’s support website for help.
Comparing Cleaning Sheets Vs. Manual Cleaning
You might wonder if cleaning sheets are enough or if manual cleaning is better. Here’s a quick comparison:
| Method | Pros | Cons | Best For |
|---|---|---|---|
| Cleaning Sheets | Quick, easy, no mess | Does not remove heavy build-up | Routine cleaning, light use |
| Manual Cleaning | Removes tough residue, deep clean | Takes more time, risk of damage if done wrong | Stubborn messes, after jams |
For best results, use cleaning sheets often and do a manual clean once a month or as needed.
How To Clean A Laminator After Sticky Labels Or Glue
Laminating sticky labels or glue-heavy projects leaves more residue than normal documents. Clean your machine right away after these jobs:
- Run a cleaning sheet through the machine.
- Open the cover and wipe the rollers with isopropyl alcohol.
- Remove any visible adhesive with tweezers and a cloth.
- Let dry and test with a blank sheet.
If you wait too long, the glue can harden and be much harder to remove.

Credit: www.youtube.com
How To Store And Maintain Your Laminator
Proper storage and care reduce cleaning needs and extend your laminator’s life:
- Always turn off and unplug after use.
- Store in a dry, dust-free place.
- Cover with a cloth or plastic cover.
- Do not stack heavy items on top.
- Schedule a deep clean every 3–6 months, even if you don’t use it often.
When To Call A Professional
Most cleaning is safe to do at home. But call a technician or your supplier if:
- The rollers are cracked, pitted, or melted
- There are electrical problems after cleaning
- You cannot remove a jammed sheet safely
- The machine is still not working after deep cleaning
Professional service can save your machine from bigger problems.
Laminator Cleaning For Schools And Shared Spaces
If you use a laminator in a school, library, or shared office, cleaning is even more important. Many people use the machine, so dirt and mistakes add up fast.
Tips for shared laminators:
- Set a cleaning schedule (weekly or after big projects).
- Train all users on proper cleaning steps.
- Keep cleaning supplies next to the machine.
- Post a quick guide nearby as a reminder.
This keeps the laminator in good shape and prevents accidents or downtime.
Environmentally Friendly Laminator Cleaning
You can clean your laminator and still be kind to the planet:
- Use reusable microfiber cloths instead of paper towels.
- Choose non-toxic, alcohol-based cleaners.
- Recycle used cleaning sheets if possible.
- Do not pour cleaning liquids down the drain.
Some companies offer eco-friendly cleaning products for office machines. These work well and are safe for most laminators.
Real-world Example: Fixing A Laminator After A Jam
Imagine you are working on a school project, and a laminating pouch jams inside your machine. What do you do?
- Stop and turn off the laminator immediately.
- Wait 30 minutes for it to cool.
- Open the top cover as shown in your manual.
- Gently pull the jammed pouch forward.
- Use tweezers to pick out any melted plastic stuck to the rollers.
- Wipe the rollers with isopropyl alcohol.
- Let everything dry, then test with a blank pouch.
Most jams can be fixed this way. If not, you may need professional help.
Frequently Asked Questions
How Often Should I Clean My Laminator?
Clean your laminator based on how often you use it. For light use (1-2 times a week), clean once a month. For daily or heavy use, clean every week. Always clean after jams or sticky projects.
Can I Use Water To Clean My Laminator Rollers?
No, do not use water on your rollers. Water can damage the machine and cause rust. Use isopropyl alcohol or a special laminator cleaner.
What Should I Do If My Laminator Smells Burnt?
A burnt smell may mean melted plastic or overheating. Turn off and unplug the machine. Let it cool, then check for stuck film or debris. Clean as described above. If the smell continues, contact a technician.
Are Cleaning Sheets Enough To Keep My Laminator Clean?
Cleaning sheets are great for regular care, but they do not remove heavy build-up. Combine them with manual cleaning every month or after jams.
Where Can I Find More Information About Laminator Maintenance?
You can find reliable tips and manuals on official manufacturer websites or on educational resources like Wikipedia.
Keeping your laminator clean is simple when you know how. With regular care, your machine will last for years and always produce perfect results. Take a few minutes after each project, and you will avoid most common problems before they start.
